Hedge Laying
Hedge Laying may be carried out to achieve a number of goals:-
- To form a barrier to livestock.
- To rejuvenate an ageing hedgerow by encouraging new growth and improving its structural strength.
- To provide increased weather protection to crops and wildlife.
Theory
The theory behind hedge laying is relatively simple. The upright stems of the hedgerow shrubs are reduced in thickness by cutting away the wood consistently on one side of the stem and in line with the course of the hedge. Each stem is then laid down along the length of the hedgerow and in between stakes that are driven into the line of the hedge at a set distance apart. These vertical stakes give the finished hedge its strength and are often bound together by additional material (often hazel whips) which is woven around the tops of the stakes.
There are a variety of different styles of hedge laying which have been developed for differing types of livestock, landscape or prevailing weather conditions.
Styles
Use this link to see a list of some of the different hedgelaying styles.
The photograph below shows a finished hedge which has been laid in a Welsh style. Picture taken at the National Hedge laying Championships held in Norfolk in 1997.

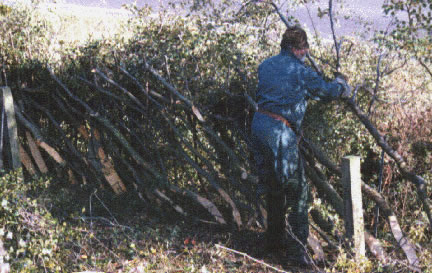
Practice
Having first sharpened your axe or bill hook, set out warning signs and placed the first aid kit near to hand, the next stage of preparation is to clear away any surrounding undergrowth (stinging nettles and brambles) to give a clear working area. This is important, not only from the point of view of avoiding stings and scratches (or some at least!) but also so that you can see the existing structure of the hedge. Now you can begin to judge which stems (or pleachers) to keep and which to cut out altogether. Also at this stage, you can assess in which direction the hedge would be best laid.
In general terms, if the hedge is on an incline, it is best to lay the hedge into the hill. In this way, the pleachers are bent over to a lesser extent and are therefore less likely to snap, they are also more likely to sustain new growth as the sap rises in the following springtime.
Before you actually start any cutting of wood, you need to ensure that you have enough space around your working area to enable you to swing the axe or bill hook safely. If you are working with someone else, it is important that they are aware that they need to stand well out of range of your maximum swing.
If you have a clear start of the hedge that you are laying, then you can start to lay the cut pleachers exactly where you want them to end up. However, if you are not starting at a natural end of the hedgerow, you will have to lay the first two or three pleachers into the field to start with and then go back and work them into the existing hedge once you have cleared some room to work within.
In order to lay a stem, it is often necessary to first clean it up by cutting off any side branches that will stop it from laying cleanly on top of previously laid stems.
Having laid the first two or three pleachers, you can position the first stake, carefully slotting it down between the pleachers and in line with the hedge. Stakes do not need to be driven into the ground to any great extent because other pleachers will be laid around them and will consolidate the hedge. Also, the hedge will usually be finished off with a binding of hazel whips around the tops of the stakes which will further strengthen the structure. It is also quite usual to have to adjust the positioning of stakes as the hedge laying progresses and over enthusiastic hammering of stakes at this point could prove bothersome later (it could also damage good hedge roots).
The method used to whittle down the pleachers will vary slightly dependent upon the size, number and shape of stems involved. However, the aim is to cut at an upward incline to the stem very near to the soil level and then follow this with a fairly shallow downward cut from above. This is repeated until the stem is just supple enough to bend over without breaking, but still has enough of the bark and sap wood left to sustain later growth.
Maintaining the angle of the lower cut is important as this will help to ensure that rainwater will run off the exposed wood which might otherwise become rotten. The ideal laid pleacher will have a cut surface that is one continuous slope rather than two separate planes.
Cutting and staking then continues along the length of the hedge, with stakes being inserted at between 18 inches to 2 foot intervals (often measured by use of the forearm).
It is often necessary to go back to pleachers that were laid earlier and adjust other side branches to bring them into line or to ease them out of the way of the neighbouring pleacher. This is achieved with the same sort of thinning cut as is used for the base of the pleacher itself. However, care must be taken to ensure that damage isn't done to the base of the pleacher by too much movement or subsequent cutting.
The hedge strength is further enhanced by binding thin hazel (or similar) whips around the tops of the stakes in a rope like fashion, introducing new whips to the binding process as you move along the length of the hedge. When this operation is complete, the tops of the stakes are trimmed off to give a uniform height and a clean finish.
All this is hard and tiring work, but the hedge layer's reward come next spring and summer when the hedge literally springs back into life with new shoots appearing along the entire length of the pleachers.
If you would like to try some hedge laying yourself, you could try contacting either 'The Conservation Volunteers' (TCV) who often run courses on hedge laying and other conservation techniques or your local Wildlife Trust.
If you have any comments on the subject of hedge laying, please complete the feedback form which can be accessed by clicking here.
To return to the top of this page click here.